
Manage your property's Whistle task management system.
Whistle Tickets
Allows users to create, dispatch, and track tickets for the property including; tasks, checklists and inspections.
![]() Tasks - Requests/Work Order
Tasks - Requests/Work Order
![]() Checklists - Admin Created Checkmark To Do List
Checklists - Admin Created Checkmark To Do List
![]() Inspections - Admin Created Daily Review (Pass, Inspect, Fail)
Inspections - Admin Created Daily Review (Pass, Inspect, Fail)
Step 1: Create Rooms
Step 2: Set User Departments
Step 3: Create Checklists
Step 4: Create Inspections
Step 5: Edit Task Types
Step 6: Create Escalations
Step 7: Create/Schedule Tickets
Step 8: View Analytics
Step 9: Export Report
Step 1: Create Rooms
Click here for more information.
Step 2: Set User Departments
Make sure all users have their assigned department in the Company -> User section to get notified when their department receives a ticket. Click here for more information on departments
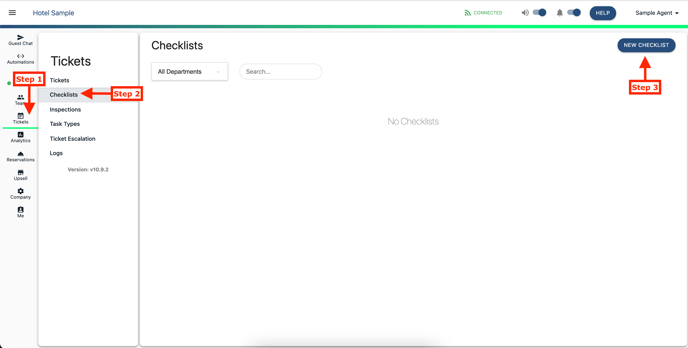
Step 3: Create Checklists
- Go to the Tickets tab inside Whistle
- Select Checklists
- Click New Checklist at the top right of page
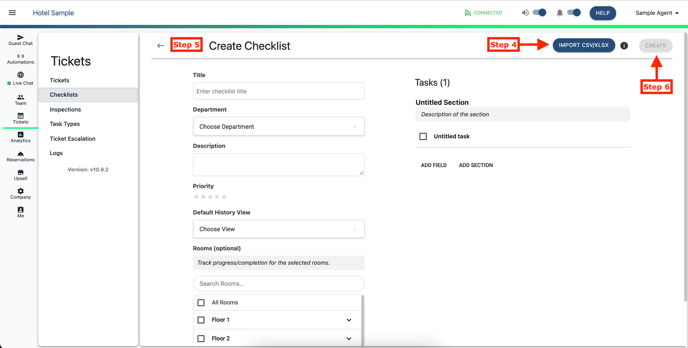
- Click Import checklist with CSV/XLSX document including columns;
- Task Name
- Task Description
- Type (SECTION, CHECKBOX)

- - OR - Fill in Checklist Details;
- Title - Checklist Name
- Department - Department assigned Checklist
- Description - Information about Checklist (optional)
- Priority - Star rating (optional)
- Default History View (optional)
- By Day
- By Week
- By Month
- By Quarter
- Room - location of checklist (optional - Room Setup located in Company Settings)
- Section - Label
- Title
- Description/Instructions (optional)
- Field - Task item
- Title
- Description/Instructions (optional)
- Title - Checklist Name
- Click Create
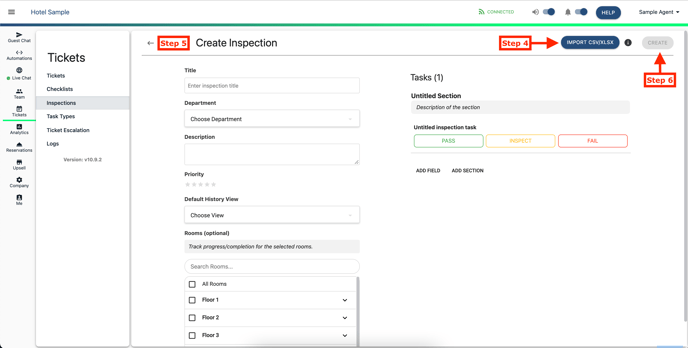
Step 4: Create Inspections
- Go to the Tickets tab inside Whistle
- Select Inspections
- Click New Inspection at the top right of page

- Click Import inspections with CSV/XLSX document including columns;
- Task Name
- Task Description
- Type (SECTION, PASS_FAIL)

- OR - Fill in Inspection Details;
-
- Title - Inspection Name
- Department - Department assigned Inspection
- Description - Information about Inspection (optional)
- Priority - Star rating (optional)
- Default History View (optional)
- By Day
- By Week
- By Month
- By Quarter
- Room - location of checklist (optional - Room Setup located in Company Settings)
- Section - Label
- Title
- Description/Instructions (optional)
- Field - Task item
- Title
- Description/Instructions (optional)
- Pass/Inspect/Fail button options
-
- Click Create
Step 5: Edit Task Types
- Go to the Tickets tab inside Whistle
- Select Task Types
- Add or Delete task types available for your users

- New task type - click + New Task Type, enter name
- Delete task type - next to the task type click the red trashcan icon
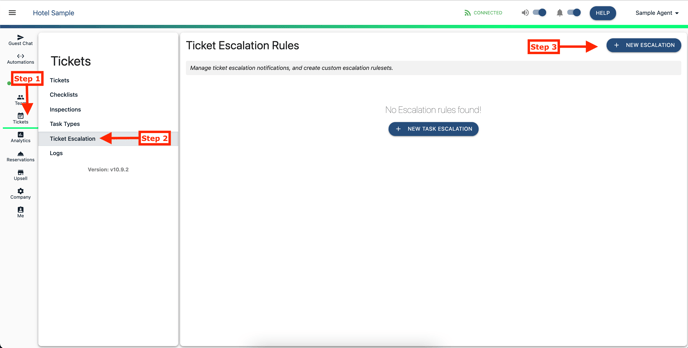
Step 6: Create Escalations
- Go to the Tickets tab inside Whistle
- Select Ticket Escalation
- Click + New Escalation
- Set the Rule Settings;
- Escalated after X minutes
- And Task Status is...
- Not Complete
- Unassigned
- Completed
- Cancelled
- And Task Department is...
- And Task Type is...
- Create Rule Trigger;
- Notify Role
- Notify Users
- Notify Department
- Follow up with Guest
- Notify a Team Chat Channel
- Send an Email
- Send a Text
- Click Save

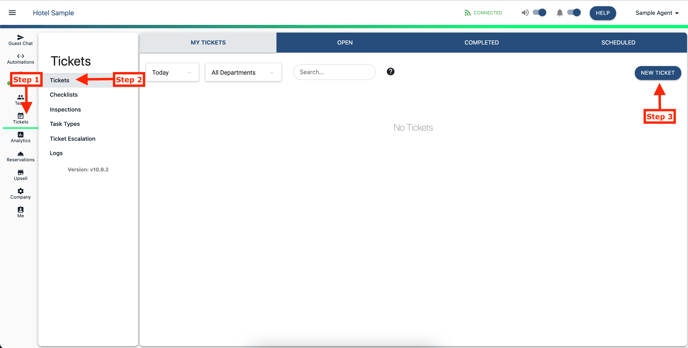
Step 7: Create/Schedule Tickets
- Go to the Tickets tab inside Whistle
- Select Tickets
- Click New Ticket at the top right of page
- Fill in Ticket Details
- Ticket Type - Task, Checklist or Inspection
- Task Type - Request/Work Order
- Checklist - Admin Created Checkmark To Do List
- Inspection - Admin Created Daily Review (Pass, Inspect, Fail)
- Assignee - whistle user to complete ticket (optional)
- Room - location of ticket (optional)
- Schedule - start and due date/time (optional)
- Repeat - recurring ticket (optional)
- Ticket Type - Task, Checklist or Inspection
- Click Create Ticket

Start
- Go to the Tickets tab inside Whistle
- Click the Open folder
- Select Ticket you wish to open
- Click Start at the top right of the side bar or underneath ticket status

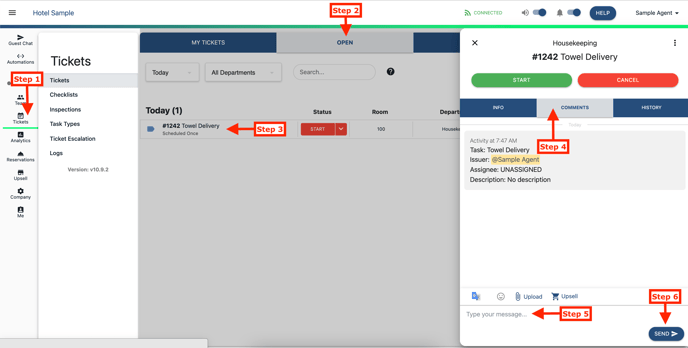
Chat
- Go to the Tickets tab inside Whistle
- Click the Open folder
- Select Ticket you wish to open
- Select Comments tab within the ticket
- Type Message
- Click Send
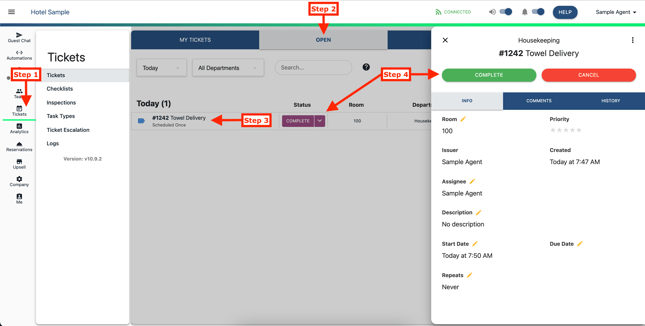
Complete
- Go to the Tickets tab inside Whistle
- Click the Open folder
- Select Ticket you wish to open
- Click Complete at the top right of the side bar or underneath ticket status
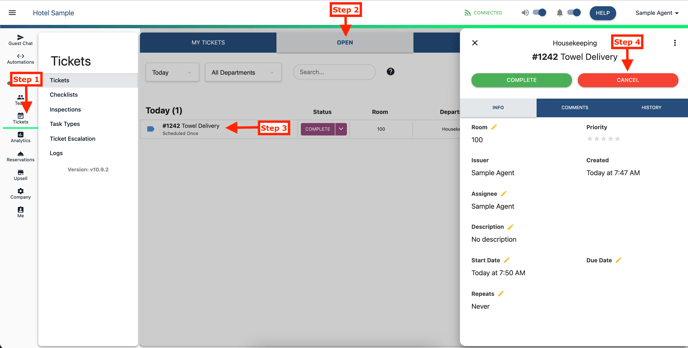
Cancel
- Go to the Tickets tab inside Whistle
- Click the Open folder
- Select Ticket you wish to open
- Click Cancel at the top right of the side bar
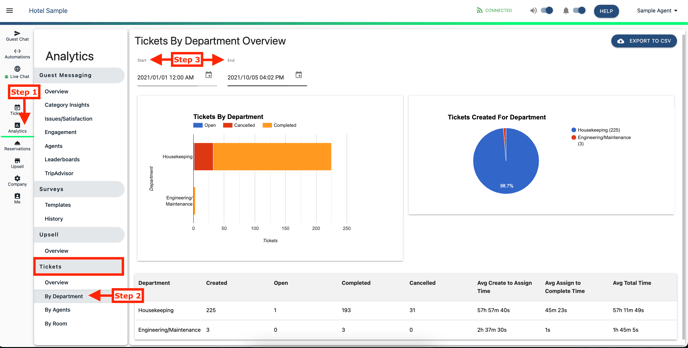
Step 8: View Analytics
- Go to the Analytics tab inside Whistle
- Select a section underneath Tickets
- Adjust Date Range at the top, if needed
Step 9: Export Report
- Go to the Analytics tab inside Whistle
- Underneath the Ticket section, select Overview
- Adjust Date Range at the top of the page, if needed
- Click Export to CSV at the top right
- Click Download

Comments
0 comments
Please sign in to leave a comment.