Manage your platform conversations.
Guest Chat
Homepage to view and send platform messages.
Conversation
Campaign
Survey
Upcoming Messages
Message Icons
- Template
- Variable
- Widget
- Translate
- Emojis
- Upload
- Upsell [Premium & Enterprise]
- Internal Note
- Send Later
Message Actions
- Reply
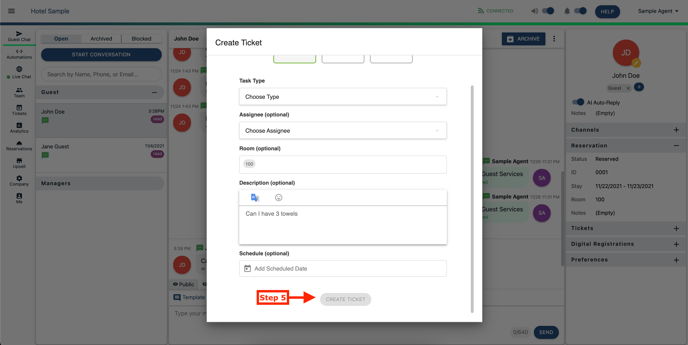
- Create Ticket
- Archive Chat
- Archive Labels
- Block Guest
- Merge Guest
- Export Messages
- Edit Guest
- Move Message
- AI Auto-Reply
- Manage Channels
Archived
Blocked
Conversation
Individual message sent from Whistle.
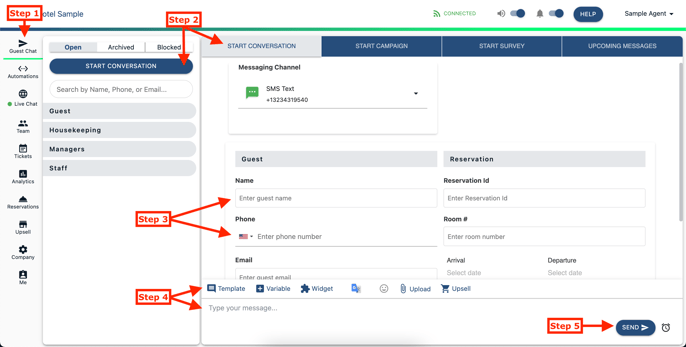
- While in the Guest Chat tab
- Click Start Conversation
- Add guest info
- Type message or utilize message icons for additional services
-
Templates
-
Variables
-
Widgets
-
Google Translate
-
Emojis
-
Upload
-
Upsell [Premium & Enterprise]
-
- Click Send or send later with clock icon
Campaign
Mass message sent individually to each number (not a group message).
-
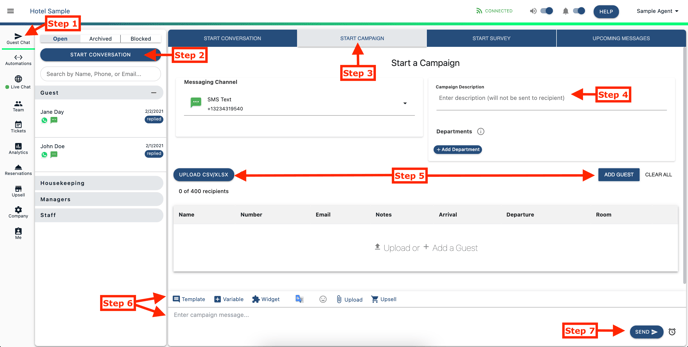
While in the Guest Chat tab
-
Click Start Conversation
-
Select Start Campaign
- Enter campaign Description
-
Add guest(s) or upload csv/excel file of guest(s) details from your PMS/reservation system
-
Type message or utilize message icons for additional services
-
Templates
-
Variables
-
Widgets
-
Google Translate
-
Emojis
-
Upload
-
Upsell [Premium & Enterprise]
-
-
Click Send or send later with clock icon
Survey
Send a question with automated reply options.
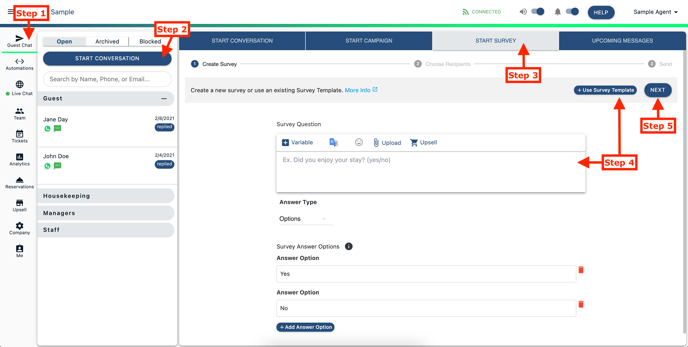
- While in the Guest Chat tab
- Click Start Conversation
- Select Start Survey
- Create new survey or click + Use Survey Template
- Click NEXT at the top right
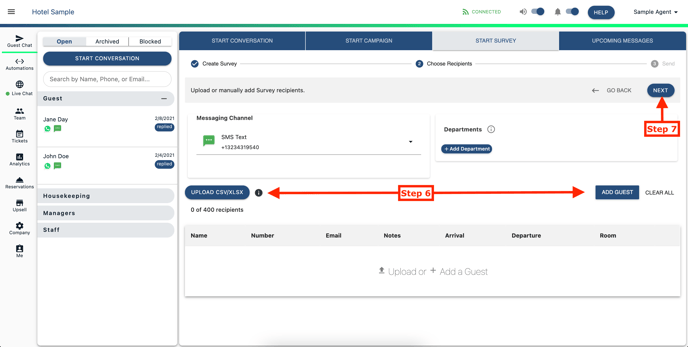
- Add guest(s) or upload csv/excel file of guest(s) details from your PMS/reservation system
- Click NEXT button at the top right
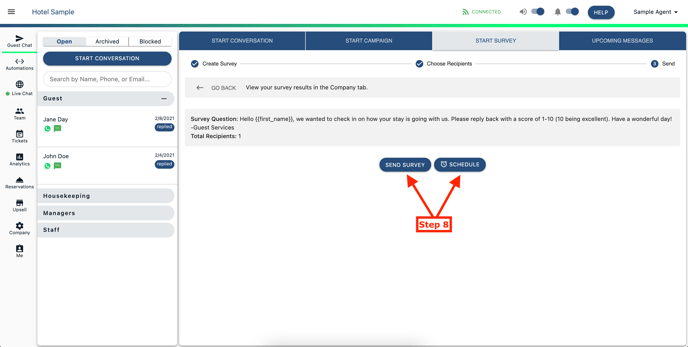
- Click Send Survey or Schedule
Upcoming Messages
Enabled automated messages scheduled to send from your platform.
-
While in the Guest Chat tab
-
Click Start Conversation
- Select Upcoming Messages
The automated messages scheduled to be sent for the day will be displayed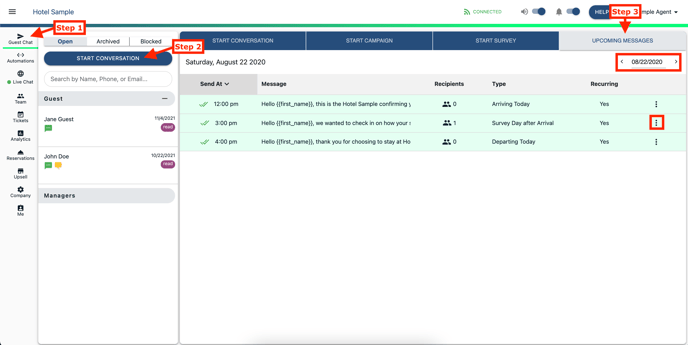
-
- You can look at past or future automated messages by adjusting the dates with the arrows at the top right
- Select 3 dot icon to remove, edit or view history of the automated message
Message Icons
Shortcuts to be added to your message.
Template
-
While in the Guest Chat tab
-
Search for guest or select guest name in 'Open' folder
- While in an open message, select the Template icon

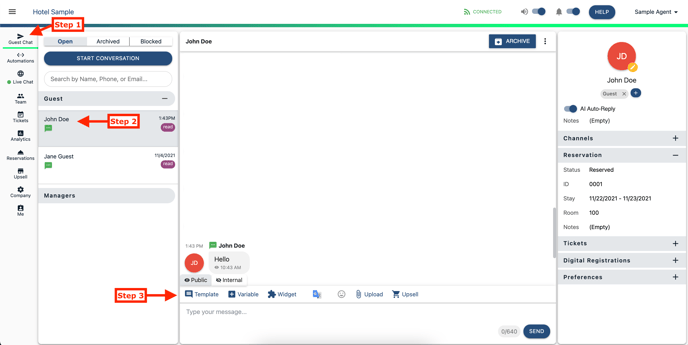
- Select Template Type to add into message
- Company Templates (Admin Created)
- User Templates (Personally Created)
- Survey Templates (Feature)
- Digital Registration (Enterprise Only Feature)
- Automated Messages (Admin Created)
The template will not immediately send, it will paste into the message box to be reviewed.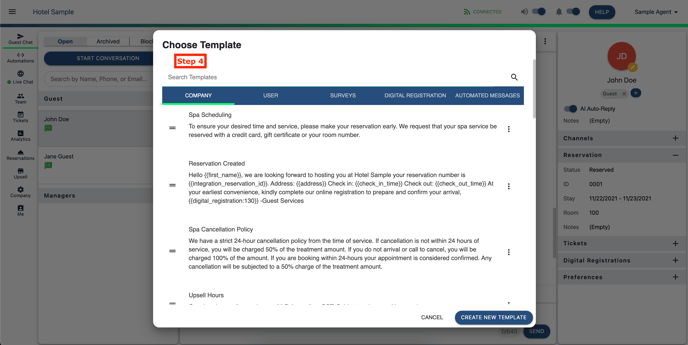
Variable
-
While in the Guest Chat tab
-
Search for guest or select guest name in 'Open' folder
- While in an open message, select the Variable icon

- Select Variable Type to add into message
The variable will not immediately send, it will paste into the message box to be reviewed.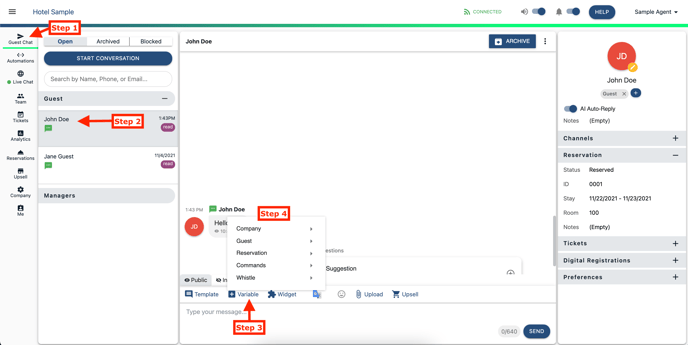
- Company - Admin Created (ex: Check-In Time, Check-Out Time)

- Guest - Guest Data (ex: Full Name, First Name, Last Name, Email)

- Reservation - Guest Data (ex: Arrival Date, Departure Date, Room Number)

- Commands - Admin Created (ex: Wifi, Shuttle)
- Whistle - Admin Create/Enabled [Enterprise]
- Guest Book

- Guest Video Link

- Guest Pin Code
- Guest Book
- Company - Admin Created (ex: Check-In Time, Check-Out Time)
Widget
-
While in the Guest Chat tab
-
Search for guest or select guest name in 'Open' folder
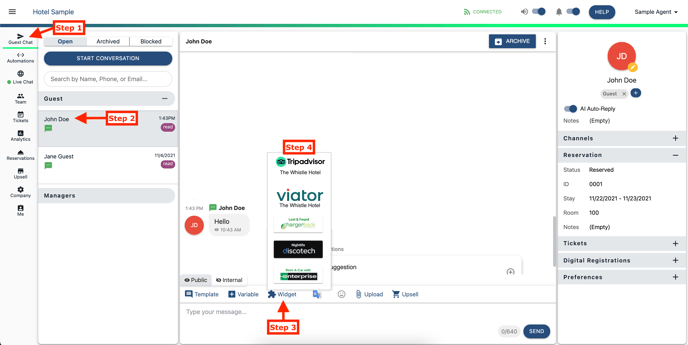
- While in an open message, select Widget with the puzzle icon

- Select Service to add into message box - Enabled by Admin
Translate
Translation is only available on the desktop version of Whistle.
-
While in the Guest Chat tab
-
Search for guest or select guest name in 'Open' folder
- While in an open message, select 3 dot icon to view message settings
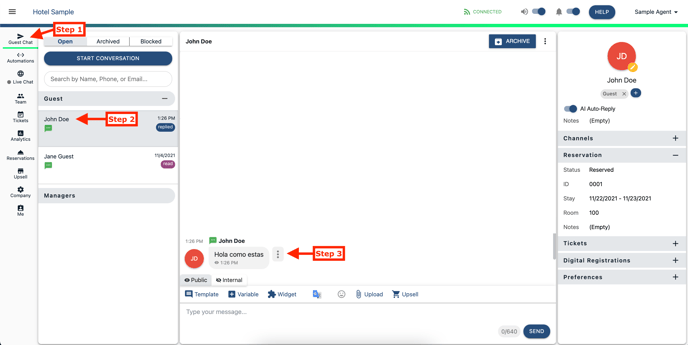
- Change the Language
- Click Translate To
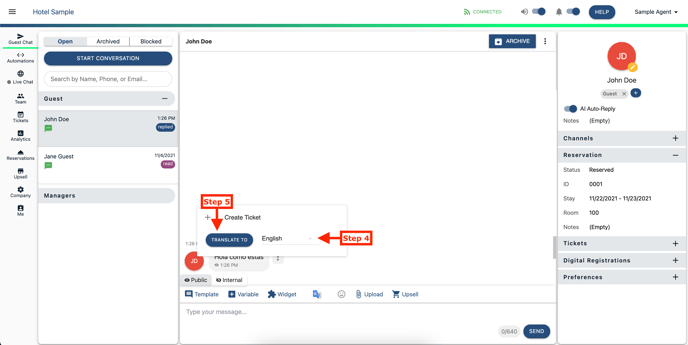
- The message will translate to the language you selected and it will show the language used in the original message.
- Type your reply message
- Click on the GoogleTranslate icon with the blue G banner

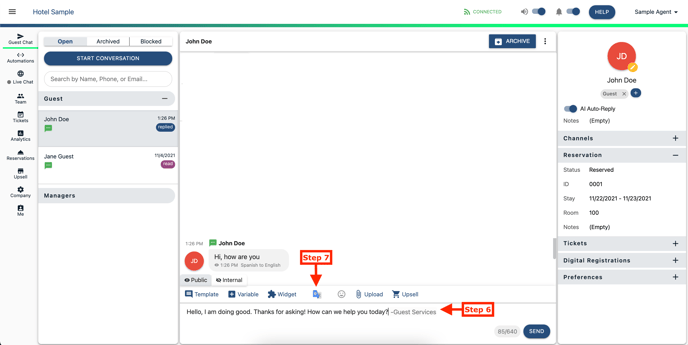
- Change the Language to what the guest used
- Click Translate To
-
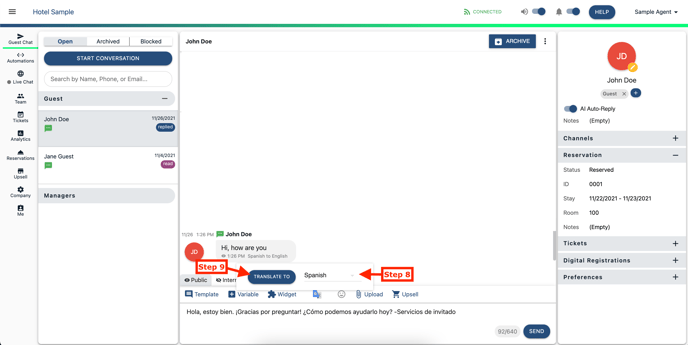
- The message will be translated the language into the message box to review before you click send.
Emojis
-
While in the Guest Chat tab
-
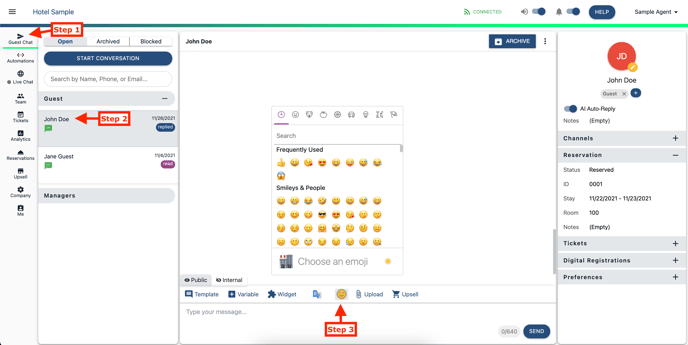
Search for guest or select guest name in 'Open' folder
- While in an open message, select the smile icon to insert emojis

Upload
-
While in the Guest Chat tab
-
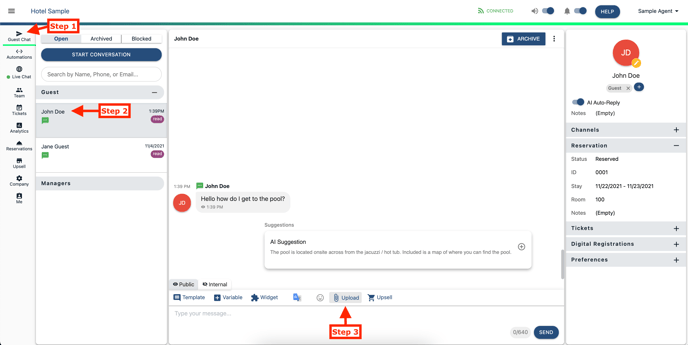
Search for guest or select guest name in 'Open' folder
- While in an open message, select the paperclip icon to attach a file to your message

- Maximum File Size: 5MB
- Carrier Attachment Size Limits:
- AT&T - 0.675 MB
- Sprint - 1.4 MB
- T-mobile - 1.5 MB
- Verizon - 0.675 MB
- File Types:
- jpeg
- png
- gif
Upsell [Premium & Enterprise]
-
While in the Guest Chat tab
-
Search for guest or select guest name in 'Open' folder
- While in an open message, select the shopping cart icon to include a product link from your upsell marketplace

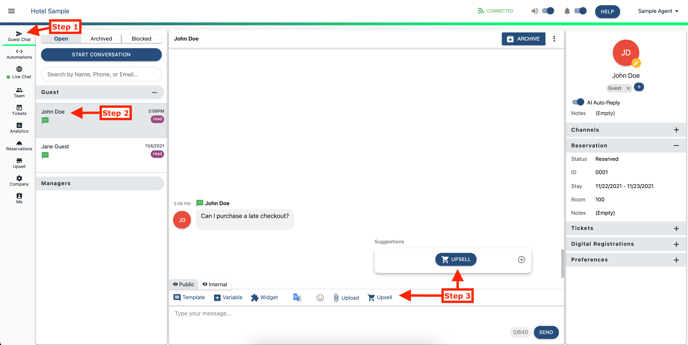
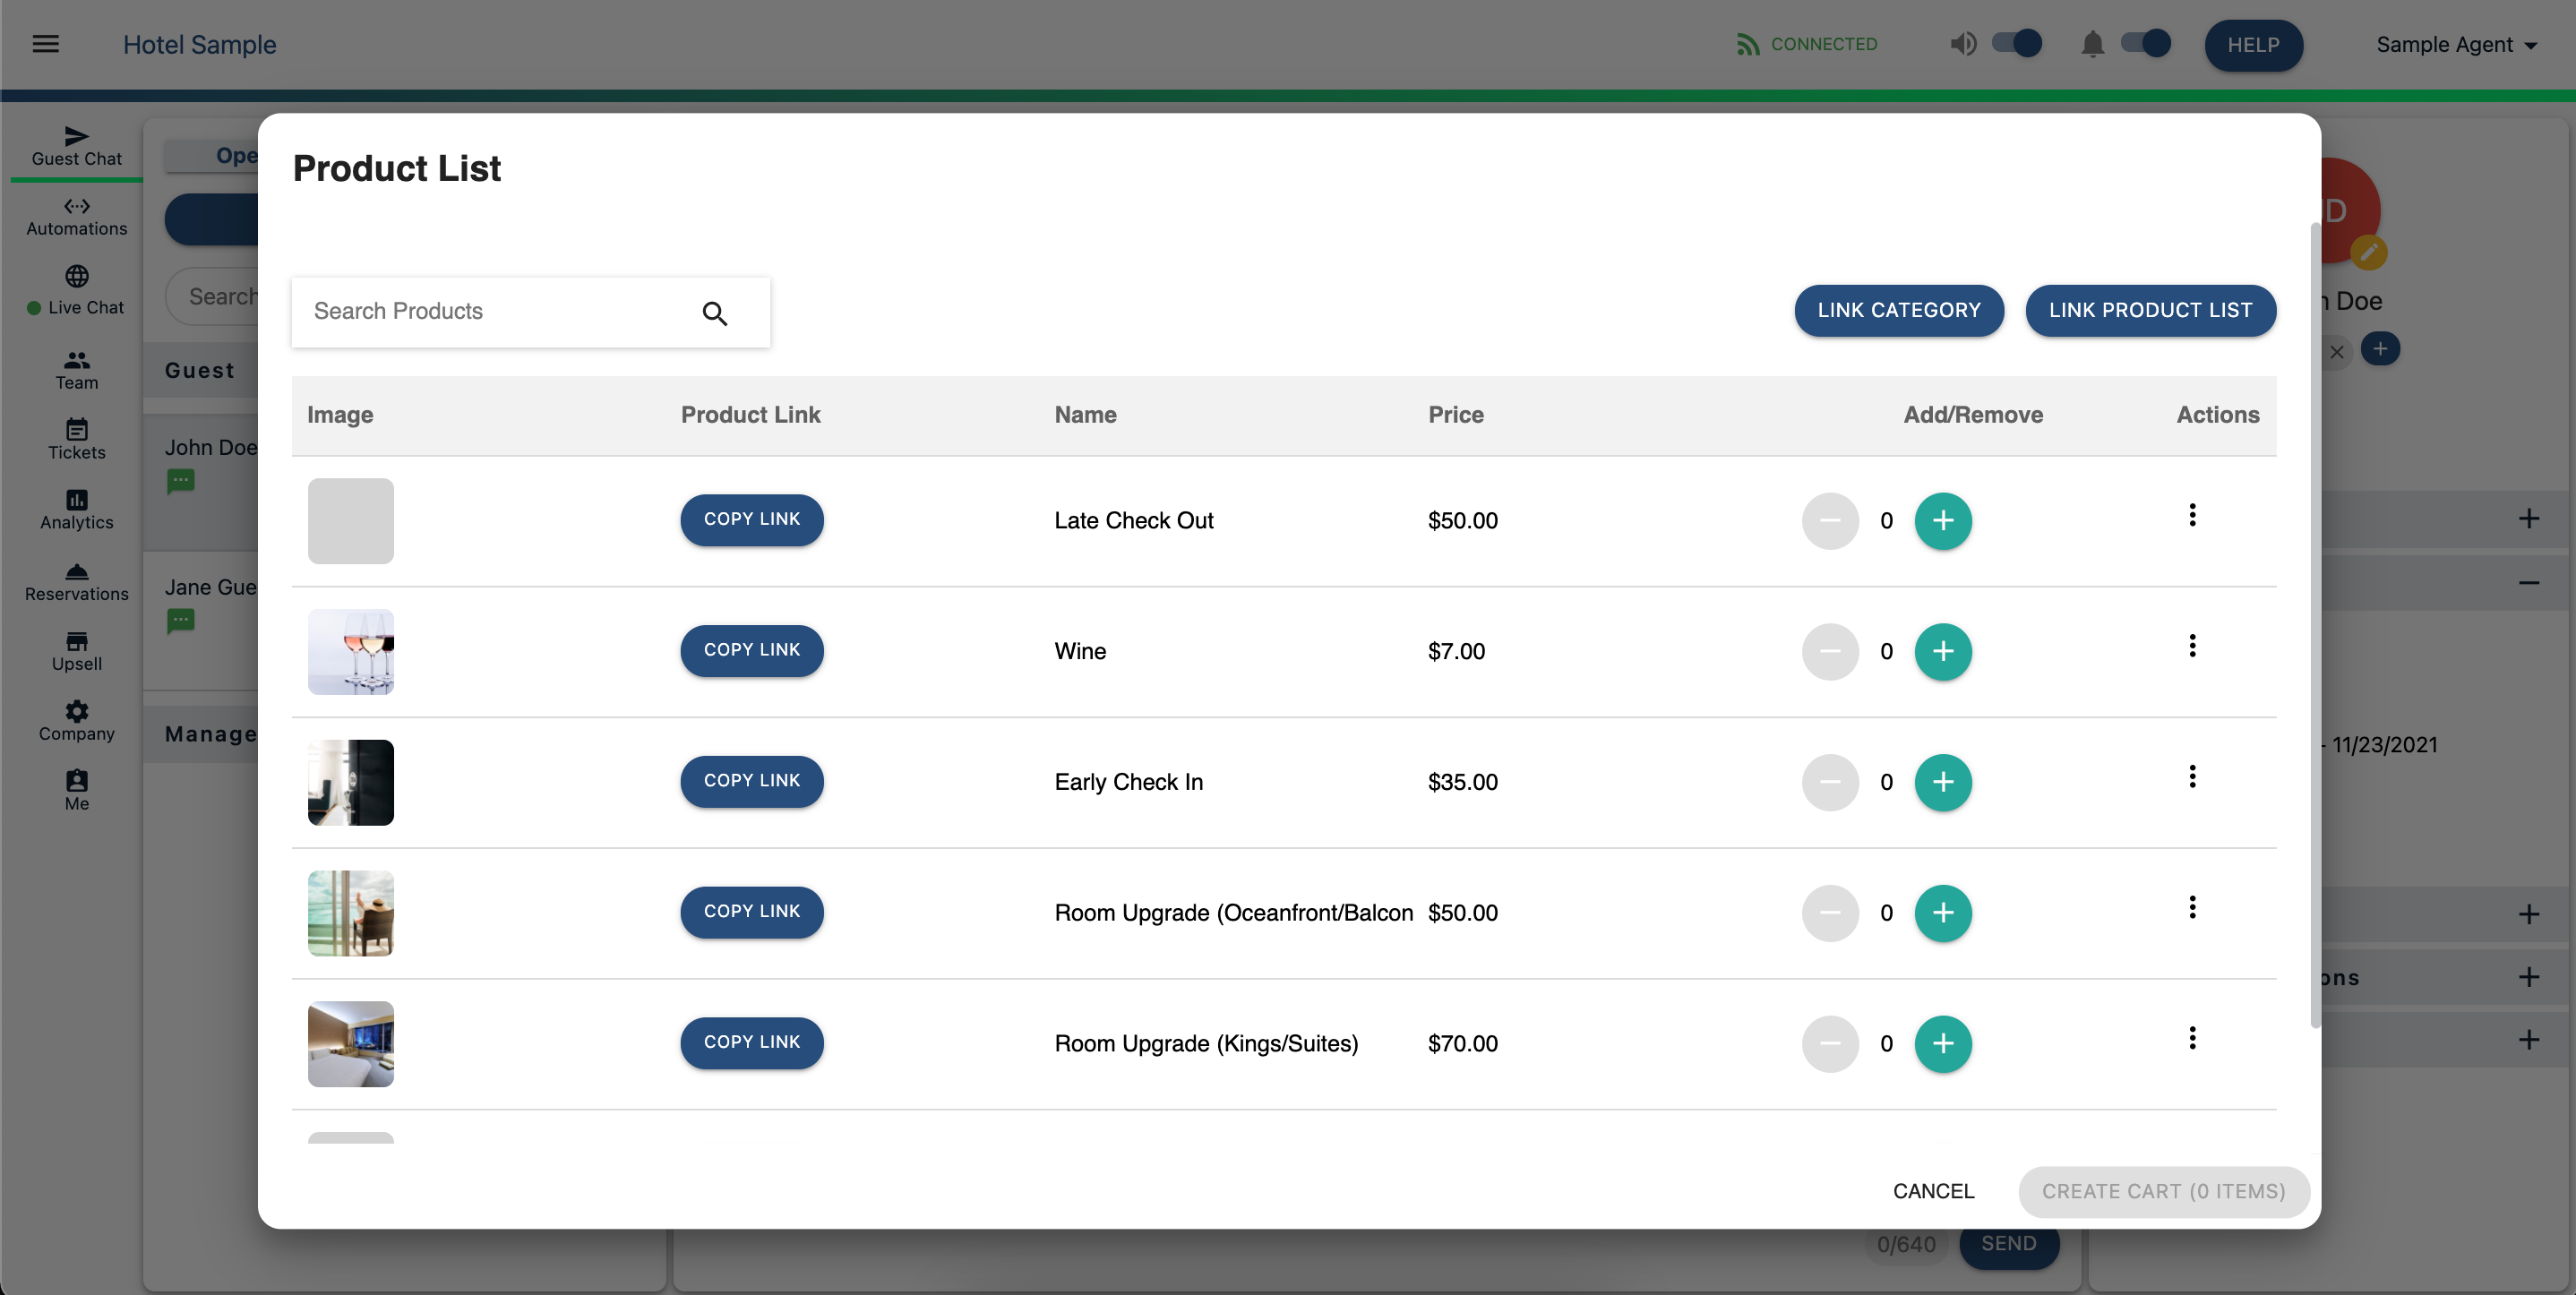
- Select product or products to send via a upsell link
Internal Note
-
While in the Guest Chat tab
-
Search for guest or select guest name in 'Open' folder
- While in an open message, above the message box select the Internal with the hidden eye icon

- Enter Note
- Click Send
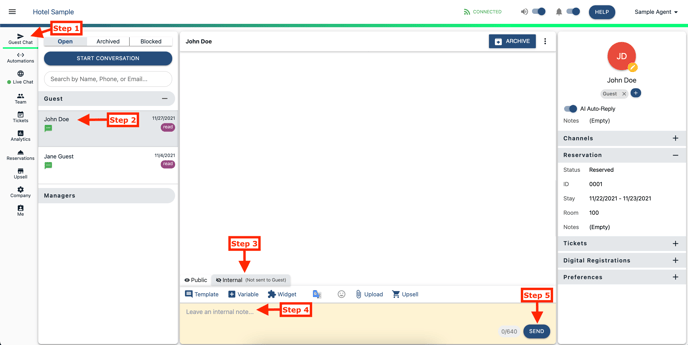
- The note will be posted in the chat history where is can be viewed by other Whistle users (NOT SEEN BY GUEST)
- To notify a specific Whistle user, use the at sign '@' with the user email or display name
Send Later
-
While in the Guest Chat tab and starting a new message
-
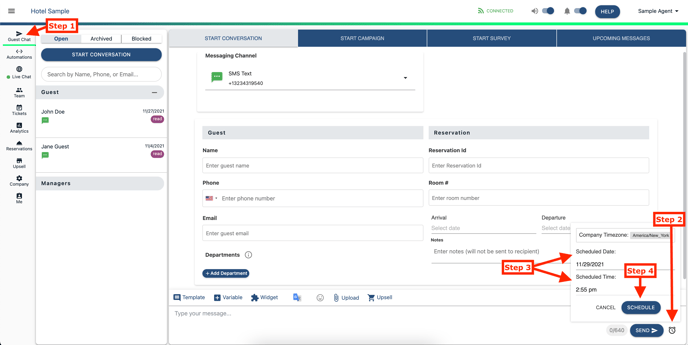
Click the Clock icon next to the send button to schedule the message to send later
-
Select Date/Time
- Click Schedule
Message Actions
Available actions in an open message.
Reply
-
While in the Guest Chat tab
-
Search for guest or select guest name in 'Open' folder
-
Type message or utilize message icons for additional services
-
Templates
-
Variables
-
Widgets
-
Google Translate
-
Emojis
-
Upload
-
Upsell [Premium & Enterprise]
-
-
Click Send
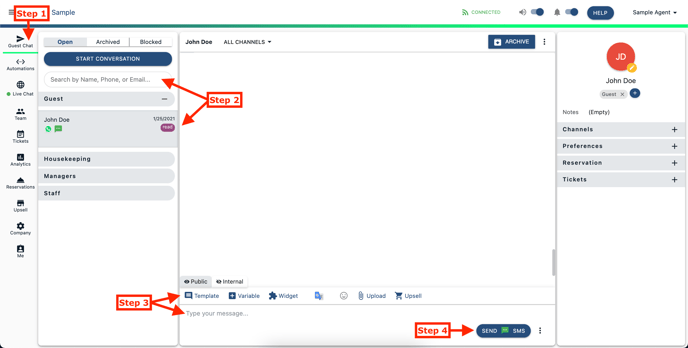
Create Ticket
-
While in the Guest Chat tab
- In an open message, select 3 dot icon to view message settings
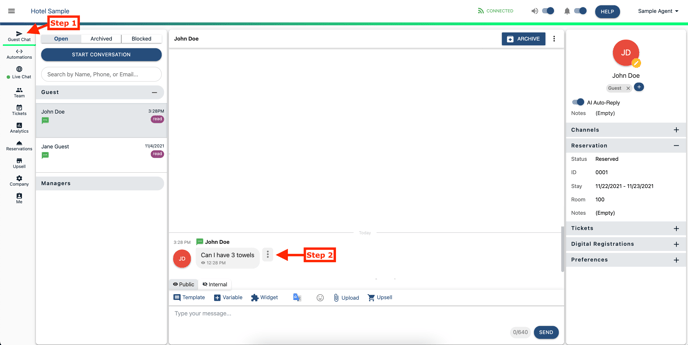
-
Click + Create Ticket
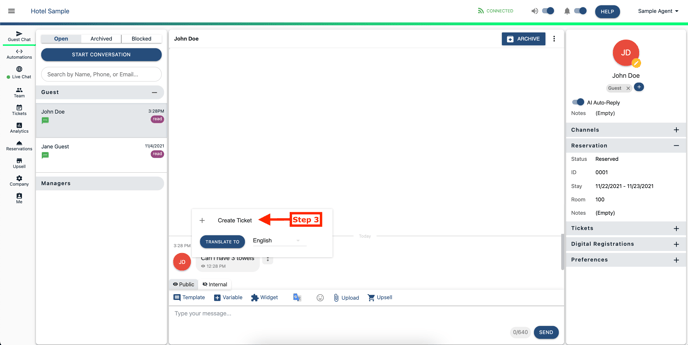
-
Enter Ticket Details
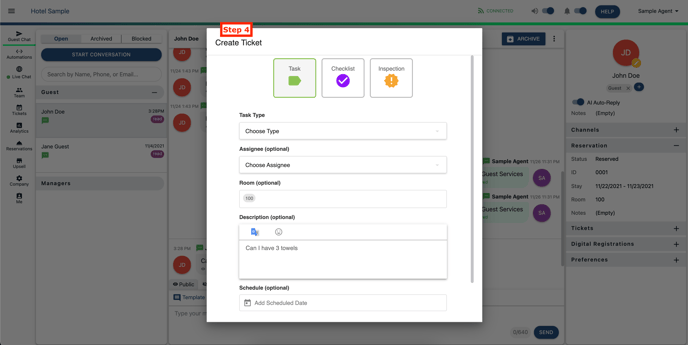
- Click Create Ticket
Archive Chat
-
While in the Guest Chat tab
-
Search for guest or select guest name in 'Open' folder
- Click the ARCHIVE button at the top of the page
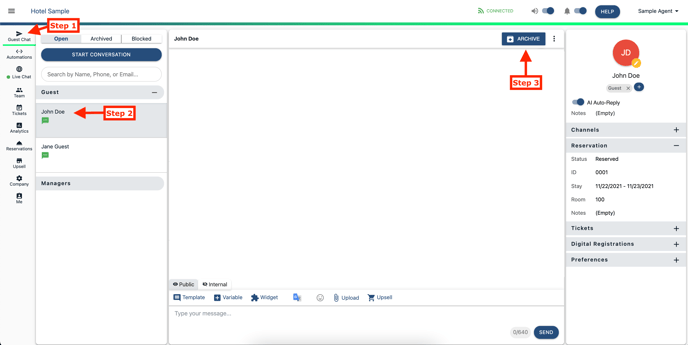
- This will move the message from the 'Open' folder to the 'Archived' folder - Admin Access Required to view
Archive Labels
- While in the Guest Chat tab
- Hover over the label category (e.g. Guest, Managers, Staff) and select the X icon that appears

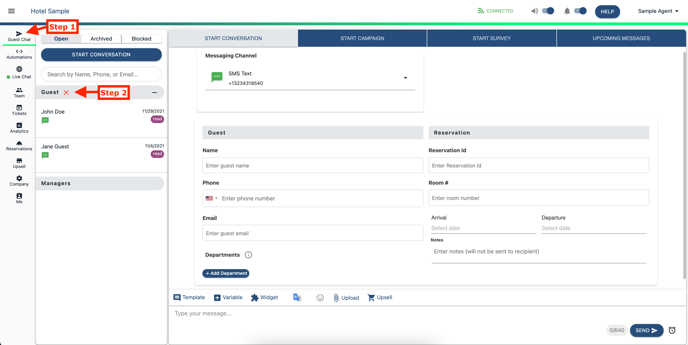
- Click to Close All Guest Chats
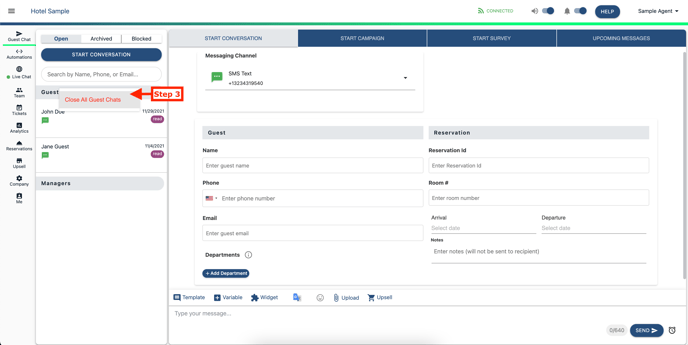
- Click Confirm
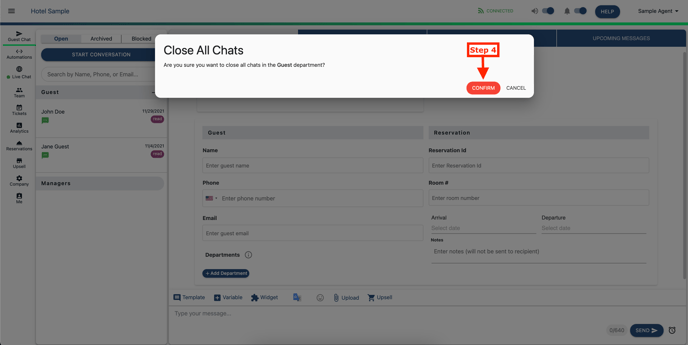
- This will move the message from the 'Open' folder to the 'Archived' folder - Admin Access Required to view
- This will move the message from the 'Open' folder to the 'Archived' folder - Admin Access Required to view
Block Guest
-
While in the Guest Chat tab
-
Search for guest or select guest name in 'Open' folder
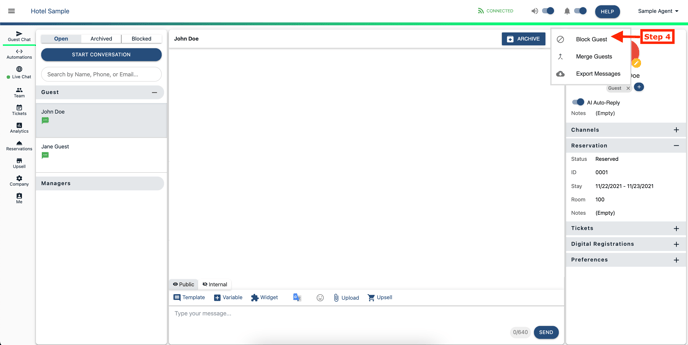
- Select 3 dot icon at the top of the page to view additional message settings
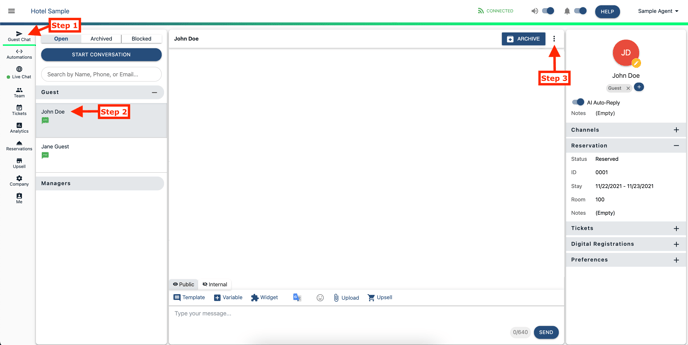
- Click Block Guest
- Click Confirm to remove
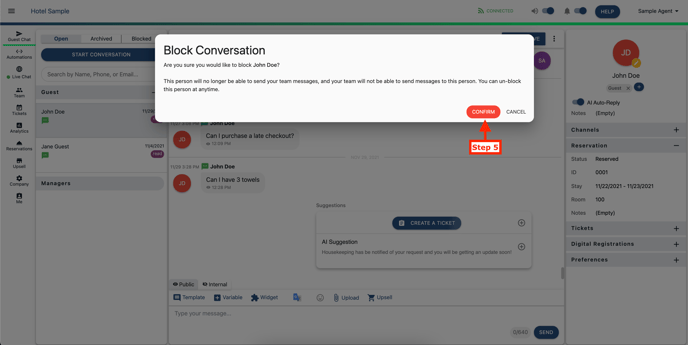
- This will move the message from the 'Open' folder to the 'Blocked' folder - Admin Access Required to view
Merge Guest
-
While in the Guest Chat tab
-
Search for guest or select guest name in 'Open' folder
- Select 3 dot icon at the top of the page to view additional message settings

- Click Merge Guests
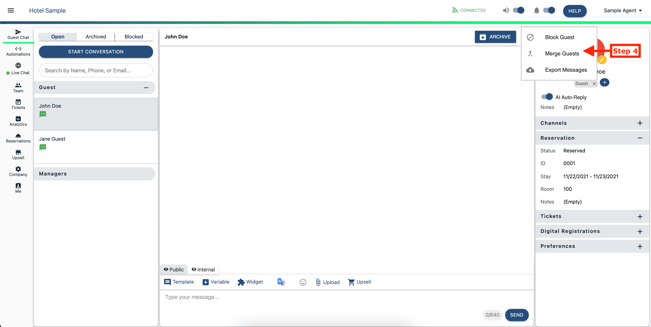
- Select Guest to merge
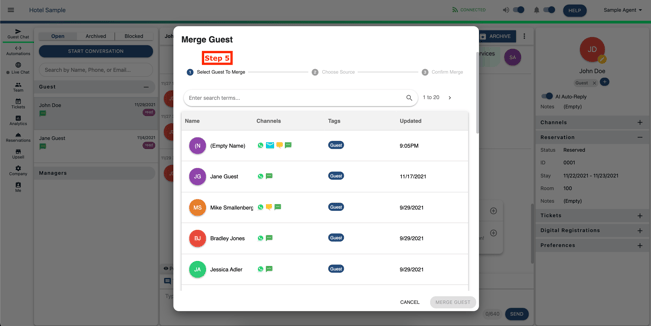
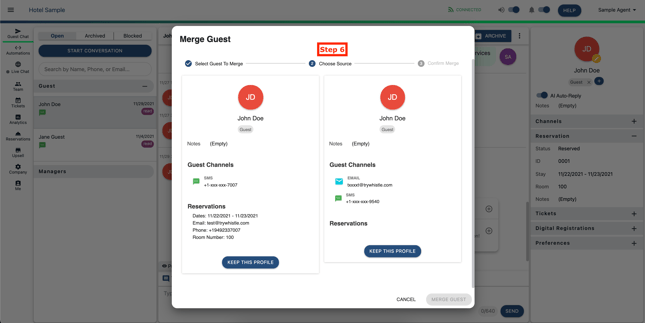
- Choose source, click Keep This Profile for the one you want
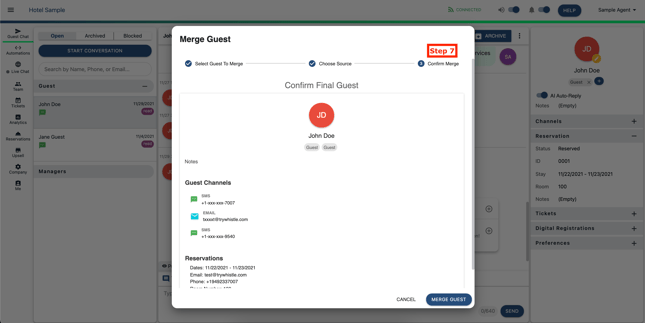
- Confirm merge and click Merge Guest
Export Messages
-
While in the Guest Chat tab
-
Search for guest or select guest name in 'Open' folder
- Select 3 dot icon at the top of the page to view additional message settings

- Click Export Messages
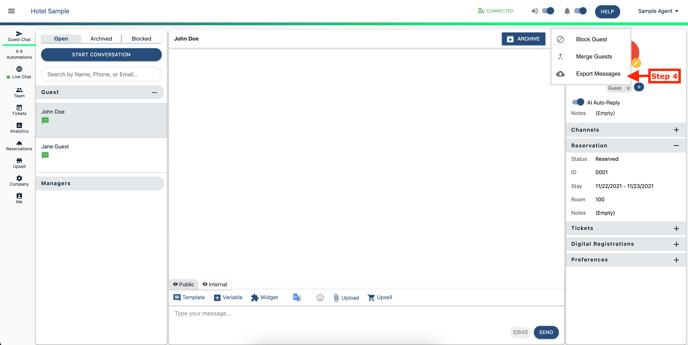
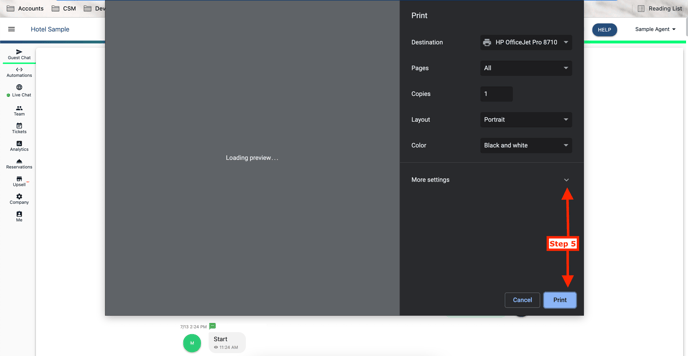
- Print or Save
Edit Guest
-
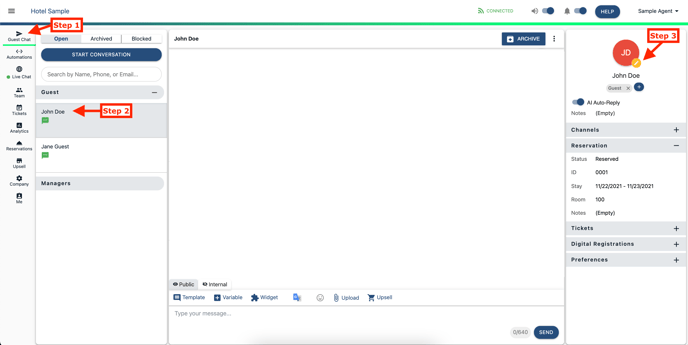
While in the Guest Chat tab
-
Search for guest or select guest name in 'Open' folder
- On the right in the guest profile, click the pencil icon by the guest avatar to edit

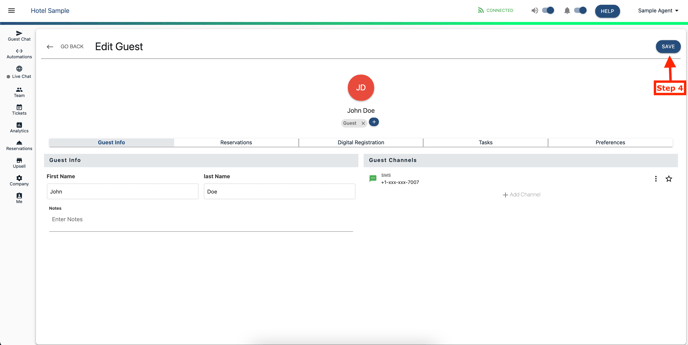
- Edit details, click Save
Move Message
-
While in the Guest Chat tab
-
Search for guest or select guest name in 'Open' folder
- On the right in the guest profile, click the blue plus sign to add/update the label where the message should stored
- Click the X to remove the old label where the message was stored
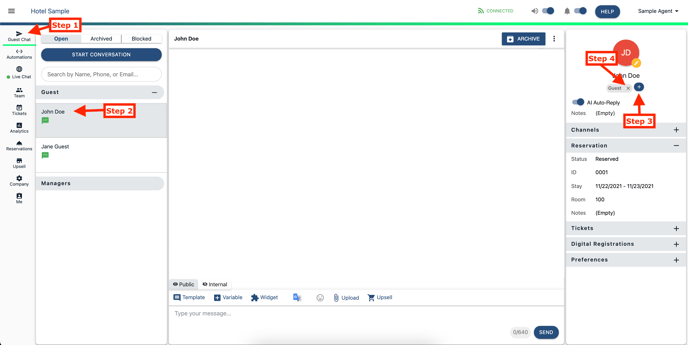
- Admin access required to update label options
AI Auto-Reply
-
While in the Guest Chat tab
-
Search for guest or select guest name in 'Open' folder
- On the right in the guest profile under the guest name flip the switch to AI Auto-Reply
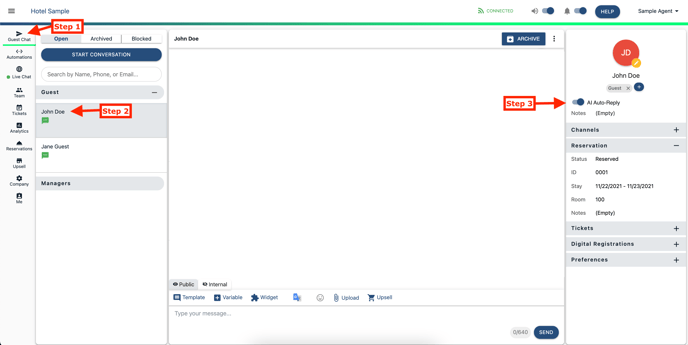
- Blue - Enabled
- Grey - Disable
Manage Channels
ADD CHANNEL
-
While in the Guest Chat tab
-
Search for guest or select guest name in 'Open' folder
- On the right in the guest profile , click the plus sign next to Channels to expand the options, it should then show a minus sign while expanded
- Click + Add Channel
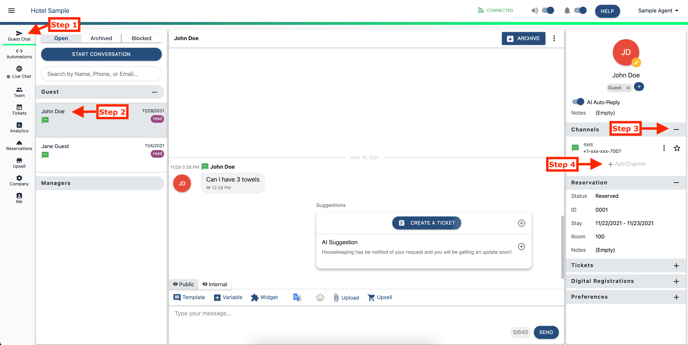
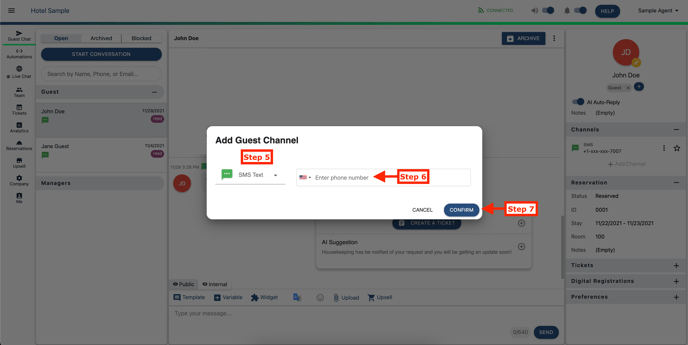
- Select Service Type
- Enter Information
- Click Confirm
RE-REQUEST OPT-IN
-
While in the Guest Chat tab
-
Search for guest or select guest name in 'Open' folder
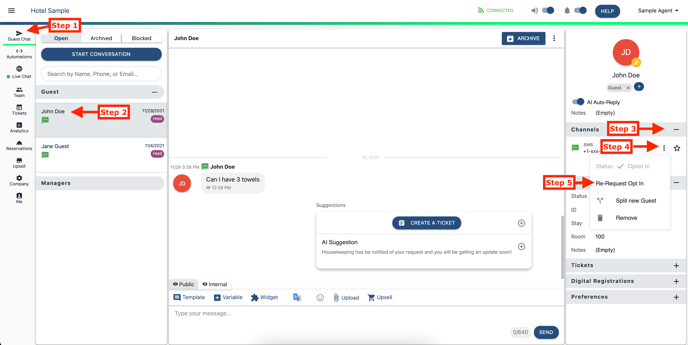
- On the right in the guest profile , click the plus sign next to Channels to expand the options, it should then show a minus sign while expanded
- Select the 3 dot icon to show more options
- Click Re-Request Opt In
SPLIT NEW GUEST
-
While in the Guest Chat tab
-
Search for guest or select guest name in 'Open' folder
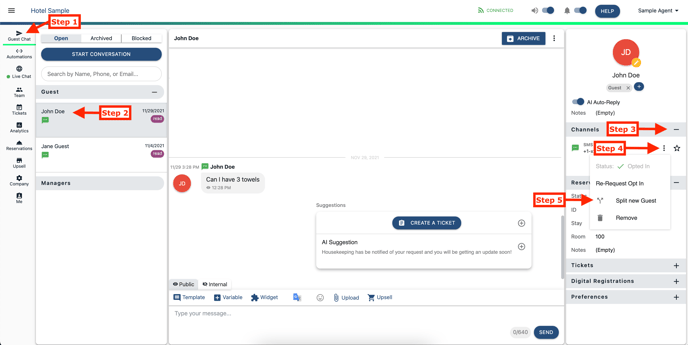
- On the right in the guest profile , click the plus sign next to Channels to expand the options, it should then show a minus sign while expanded
- Select the 3 dot icon to show more options
- Click Split new Guest
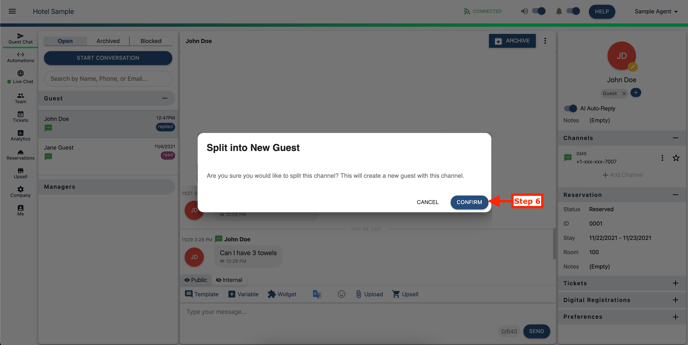
- Click Confirm
REMOVE
-
While in the Guest Chat tab
-
Search for guest or select guest name in 'Open' folder
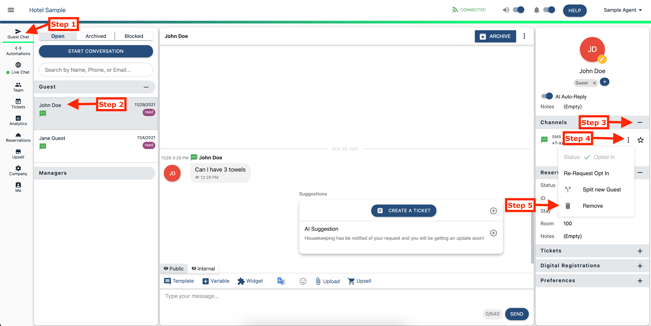
- On the right in the guest profile , click the plus sign next to Channels to expand the options, it should then show a minus sign while expanded
- Select the 3 dot icon to show more options
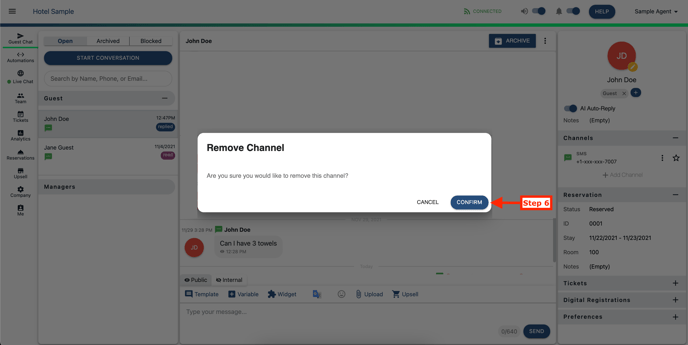
- Click Remove
- Click Confirm
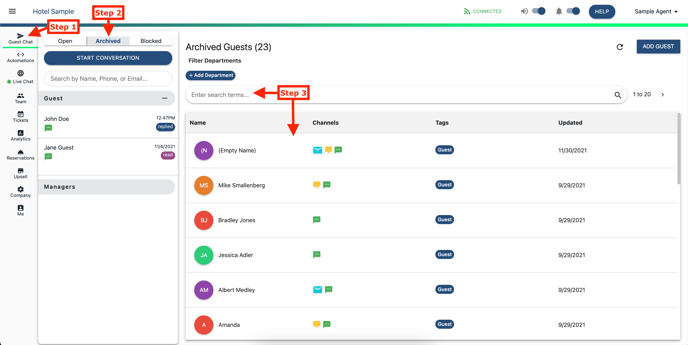
Archived
-
While in the Guest Chat tab
-
Click Archived tab next to the Blocked folder - Admin Access Required
- Search or select the guest to view message history
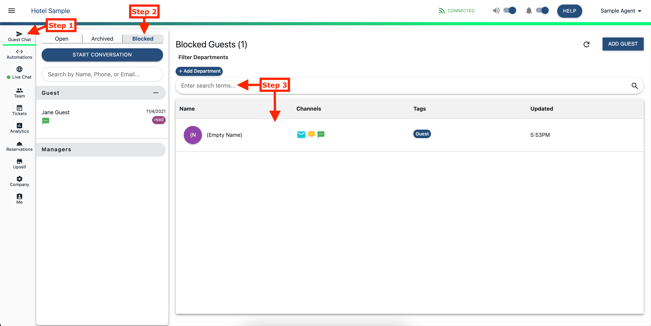
Blocked
-
While in the Guest Chat tab
-
Click Blocked tab next to the Archived folder - Admin Access Required
- Search or select the guest to view message history
-
Once guest is blocked, property will no longer receive any messages from number additionally, your team will be unable to send any messages to number
-
UN-BLOCKED
-
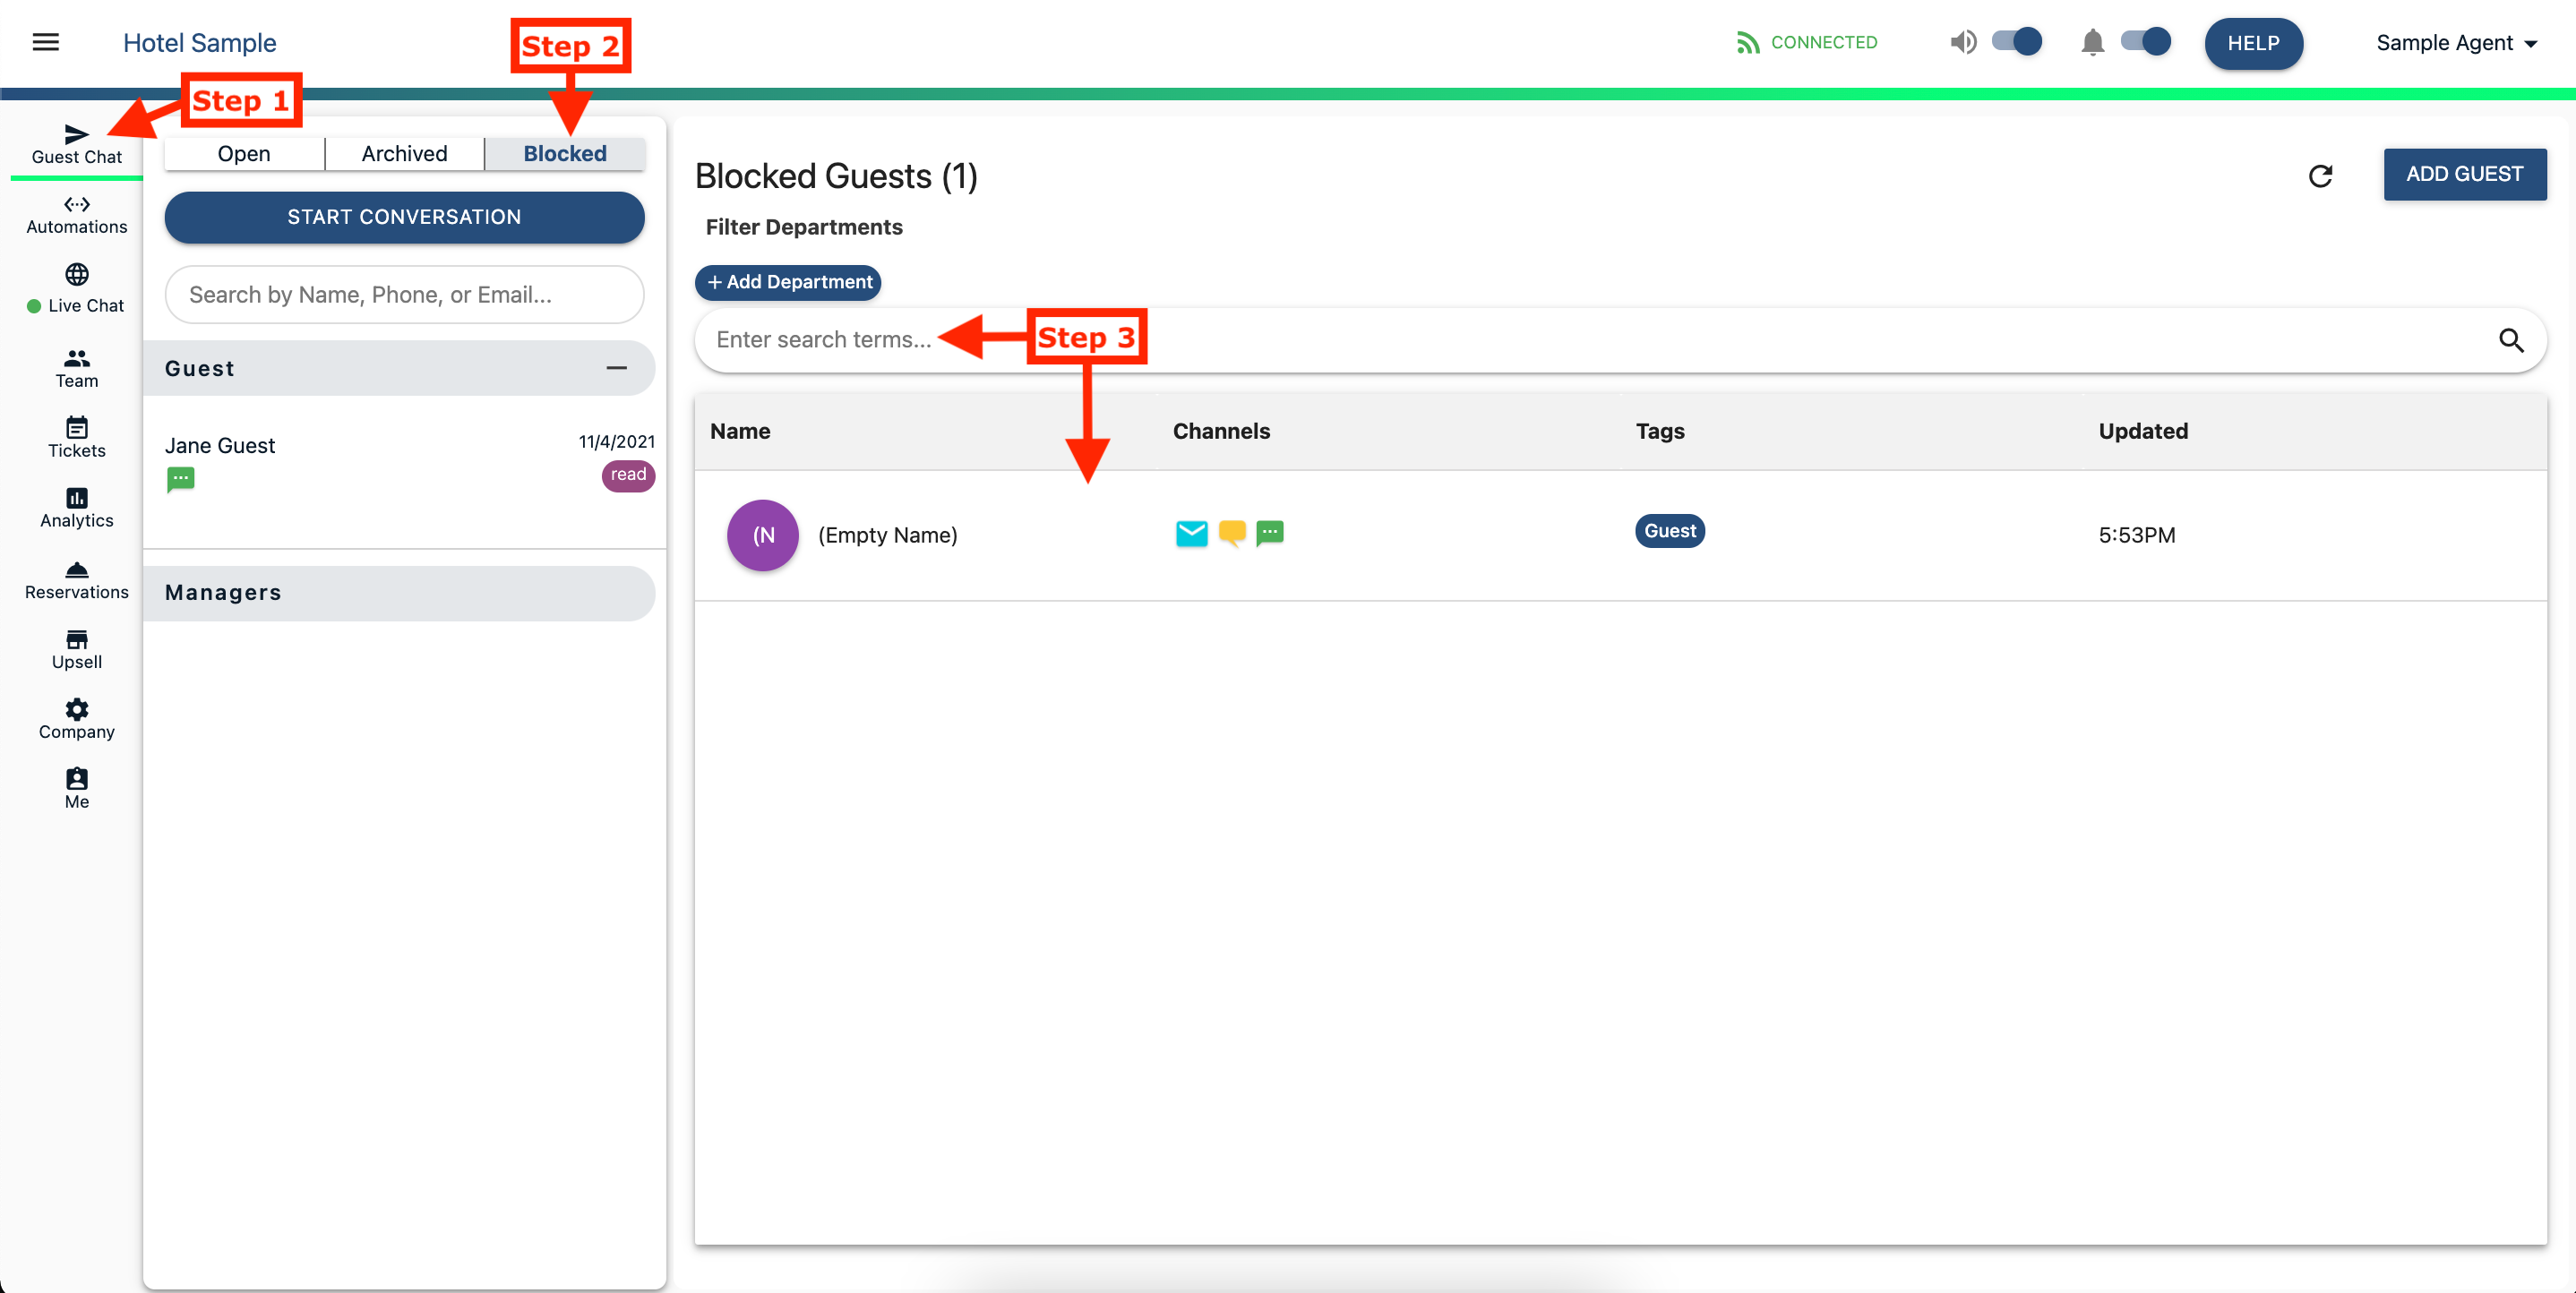
While in the Guest Chat tab
-
Click Blocked tab next to the Archived folder - Admin Access Required
- Search or select the guest to view message history
-
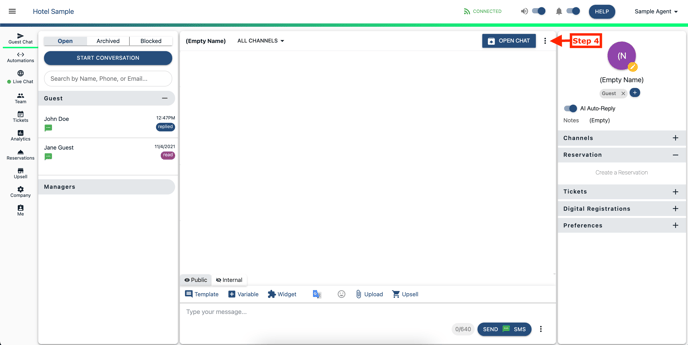
Select 3 dot icon at the top of the page to view additional message settings
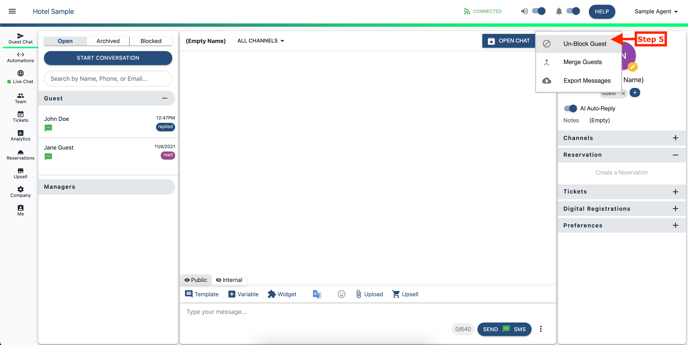
- Select Un-Block Guest
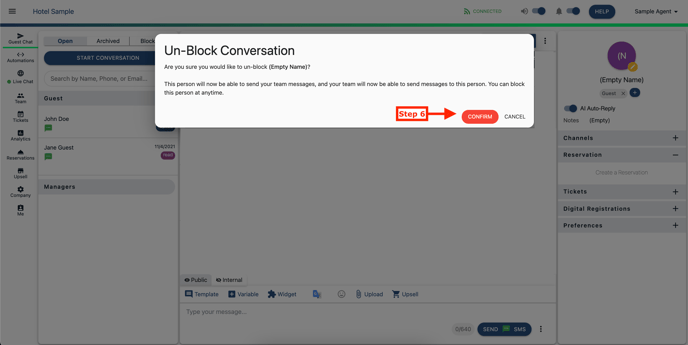
- Click Confirm
Comments
0 comments
Please sign in to leave a comment.